
Google Analytics is an essential tool for almost any marketer that wants to make data-driven decisions. While Shopify has made it extremely easy to add the old version of Google Analytics (Universal Analytics) to your store’s website, the popular ecommerce platform hasn’t been updated to make adding the newest version, Google Analytics 4, to your website.
There are already many articles explaining how to add Google Analytics 4 to Shopify by adding the code measurement ID to the theme.liquid file, but if you aren’t using Shopify Plus, that won’t allow you to track the checkout process. To track the ecommerce checkout steps on Shopify with GA4, we will show you how to add Google Analytics 4 to your Shopify store by placing it in a Google Tag Manager (GTM) container.
While we wait for Shopify to update its platform to integrate Google Analytics 4 as seamlessly as Universal Analytics, follow the steps below for a workaround to ensure you future-proof your ecommerce website with the newest Google Analytics and you can track the full checkout process.
Steps to Add Google Analytics 4 to Shopify
- Create A GTM Container
- Modify GTM Code
- Add GTM to Shopify
- Add GA4 to GTM
- Preview, Test, & Publish GTM
Create a GTM Container
The first step to tracking your Shopify store with Google Analytics 4 is to actually create a Google Tag Manager container. If you aren’t familiar with Google Tag Manager, check out our introduction to GTM to get some background and see why it makes tagging and tracking a website much easier.
Modify GTM Code
Once you create your GTM container, you’ll be given two snippets of code. Copy the first snippet (the one that goes in the of the website) and remove the tags from the code. Your new code should look like this:
(function(w,d,s,l,i){w[l]=w[l]||[];w[l].push({'gtm.start':
new Date().getTime(),event:'gtm.js'});var f=d.getElementsByTagName(s)[0],
j=d.createElement(s),dl=l!='dataLayer'?'&l='+l:'';j.async=true;j.src=
'https://www.googletagmanager.com/gtm.js?id='+i+dl;f.parentNode.insertBefore(j,f);
})(window,document,'script','dataLayer','GTM-XXXXXXX');
Pro Tip: If you use the code above, make sure to replace GTM-XXXXXXX with your own GTM container ID.
Add Google Tag Manager to Shopify
After you’ve edited the first GTM code snippet, open up your Shopify Admin in a new tab.
- Navigate to Online Store
- Click Preferences
- Scroll down to the Google Analytics section
- Ensure that Universal Analytics is already set up
- Paste your modified GTM snippet at the top of the Additional Google Analytics JavaScript section
- Click Save
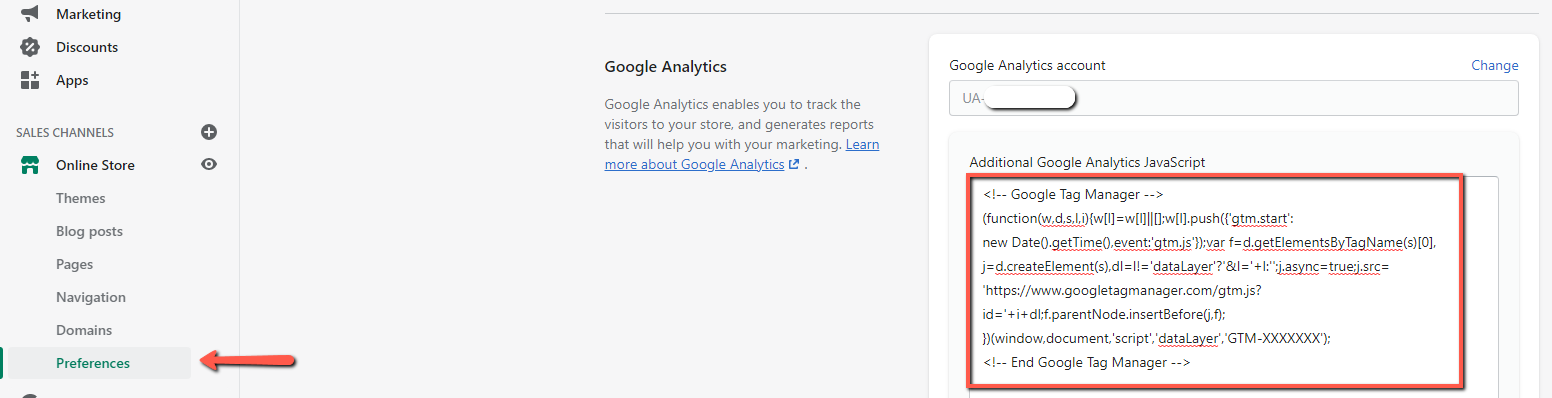
After that, you’ve added GTM to your full Shopify website including the Shop, Cart, Checkout, Payment, and Order Confirmation page.
Pro Tip: Unfortunately, the official Shopify documentation instructs you to add Google Tag Manager to the theme.liquid file, but following those steps won’t means you won’t be able to place GTM, Google Analytics 4, or any other tags on any pages in the checkout process unless you have a Shopify Plus account. Follow our steps exactly and you’ll be able to use GA4 even before Shopify officially supports it, regardless of the Shopify plan you use.
Add Google Analytics 4 to Google Tag Manager
Now that GTM is placed on your entire Shopify website, you can proceed to add any tags you want to any part of your website. We have a whole guide on how to add Google Analytics to GTM, but since we recommend using Shopify’s native Universal Analytics integration, you can follow the steps below to implement Google Analytics 4 without any conflicts.
To add GA4 to your Shopify site via GTM,
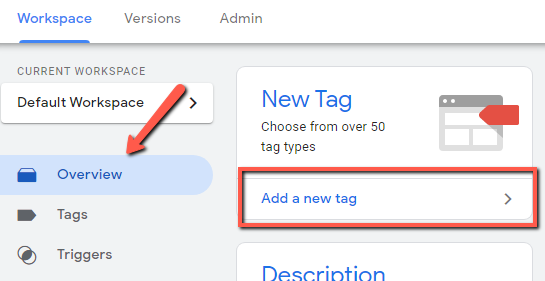
- Navigate to tagmanger.google.com
- Select your GTM container (if you have more than one)
- From the Overview page, choose “Add a new tag”
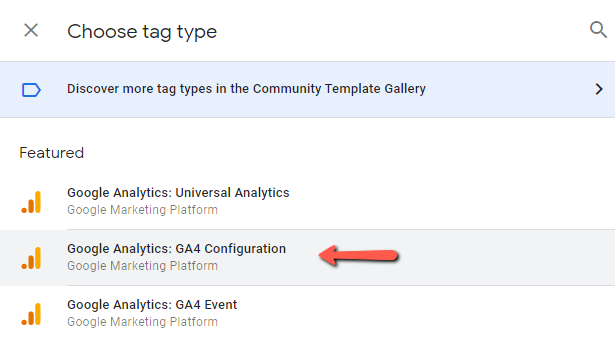
- Choose the “Google Analytics: GA4 Configuration” tag
- Give your Tag a name like, “GA4 – Configuration & Page View”
- Add in your Google Analytics 4 Measurement ID (It will start with “G-”).
- Make sure the checkbox for “Send a page view event when this configuration loads” is checked.
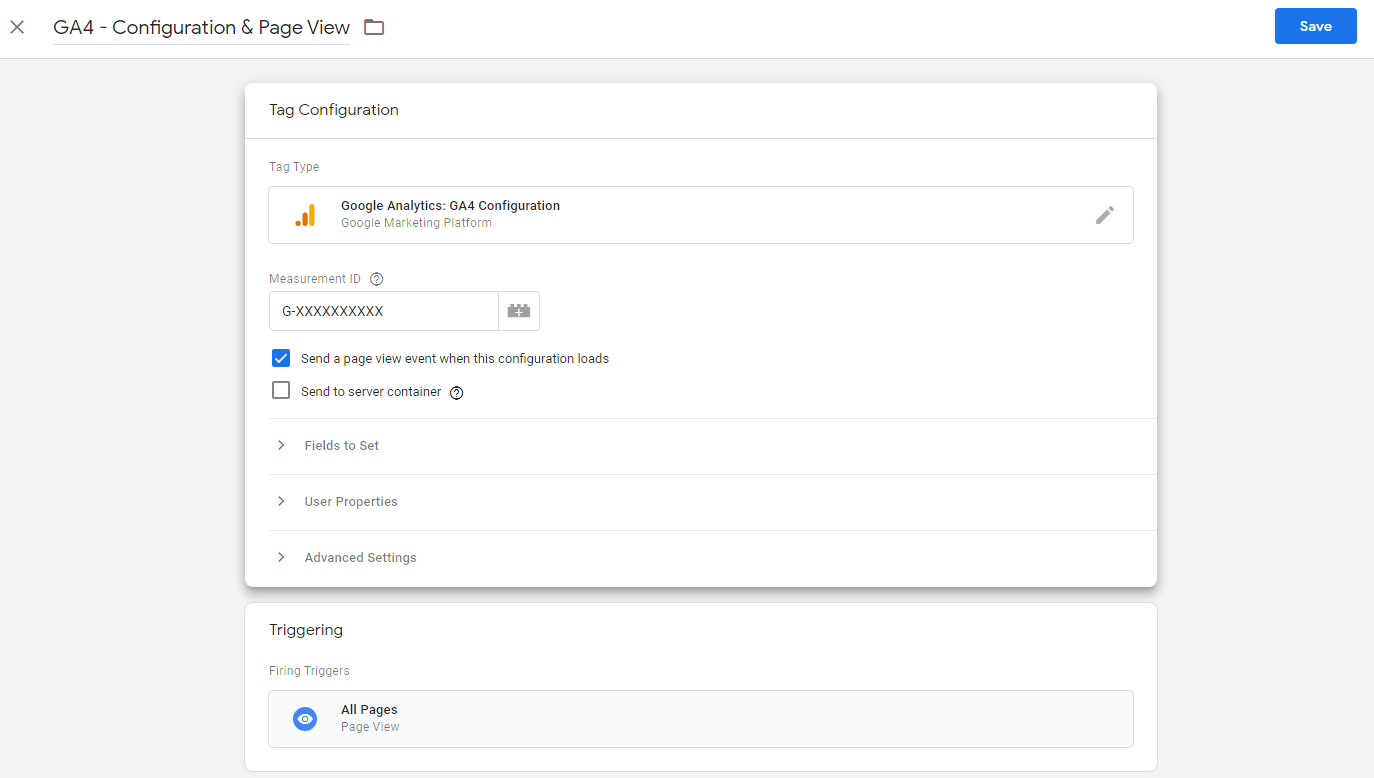
- Set your GA4 Configuration tag to fire on All Pages
- Click Save
Preview, Test, & Publish Your GTM Container
The very last step whenever you add a new tag to GTM is to enable Preview Mode, verify that your new Google Analytics 4 tag is firing on all pages, including the cart, checkout, and thank you page, then publish your GTM container to push it live.
Congratulations! You’ve added Google Analytics 4 to Shopify the correct way and even before it’s natively supported by the ecommerce giant.
If you have any questions or run into trouble along the way, feel free to contact our tagging & tracking experts and we’ll be happy to help you out.
- Home page
- Content Marketing
- Digital Marketing Strategy
- Digital Marketing Strategy
- Digital Marketing Strategy
- PPC
- SEO
- Social maketing
- WordPress web development